
Sorry guys - I'm a couple of weeks late on our ongoing series comparing Alternate Picking vs. Sweep Picking. I had less time for blog writing than I expected on our Japanese Tour!
We've already looked at some great ways to build up and use your alternate picking skills in solos and rhythm playing, so this week we're going to look at the basics of straight sweep picking, including:
- How to actually perform a sweep pick
- The best shapes to use when sweep picking in solos
- When to use sweep picking to match your melodies to the rhythm section
Before we begin, let me clear up one myth around sweep picking.
Sweep picking is NOT an advanced technique.
Chances are, if you give any beginner a guitar and ask them to play any of the shapes I'm going to give you, they'll probably use sweep picking straight off the bat without even knowing what it is, because it is the most logical way of playing certain phrases on the guitar.
So, before you tell me "I'm not good enough to do sweep picking", read this article and try the exercises. You'll be surprised how easy it is!
How do I actually do a sweep?
Basically, a sweep is when we pull through the strings of the guitar in order, either up or down, then go back the other way.
For example, if I was to play an open Em chord and just pick from the low E to the high E with downstrokes, then go back up the guitar with upstrokes, I've just performed a 6 string sweep.
More commonly, it's used as a super fast technique in lead playing for moving between arpeggio shapes all over the guitar (sometimes 3 strings, sometimes more). Basically, when you get the speed up, it sounds like a blur of notes that all work together very nicely.
Step 1: Focus on ONE Triad Sweep
On the top 3 strings, there are 3 major triad shapes and 3 minor triad shapes.
These are perfect for sweeping.
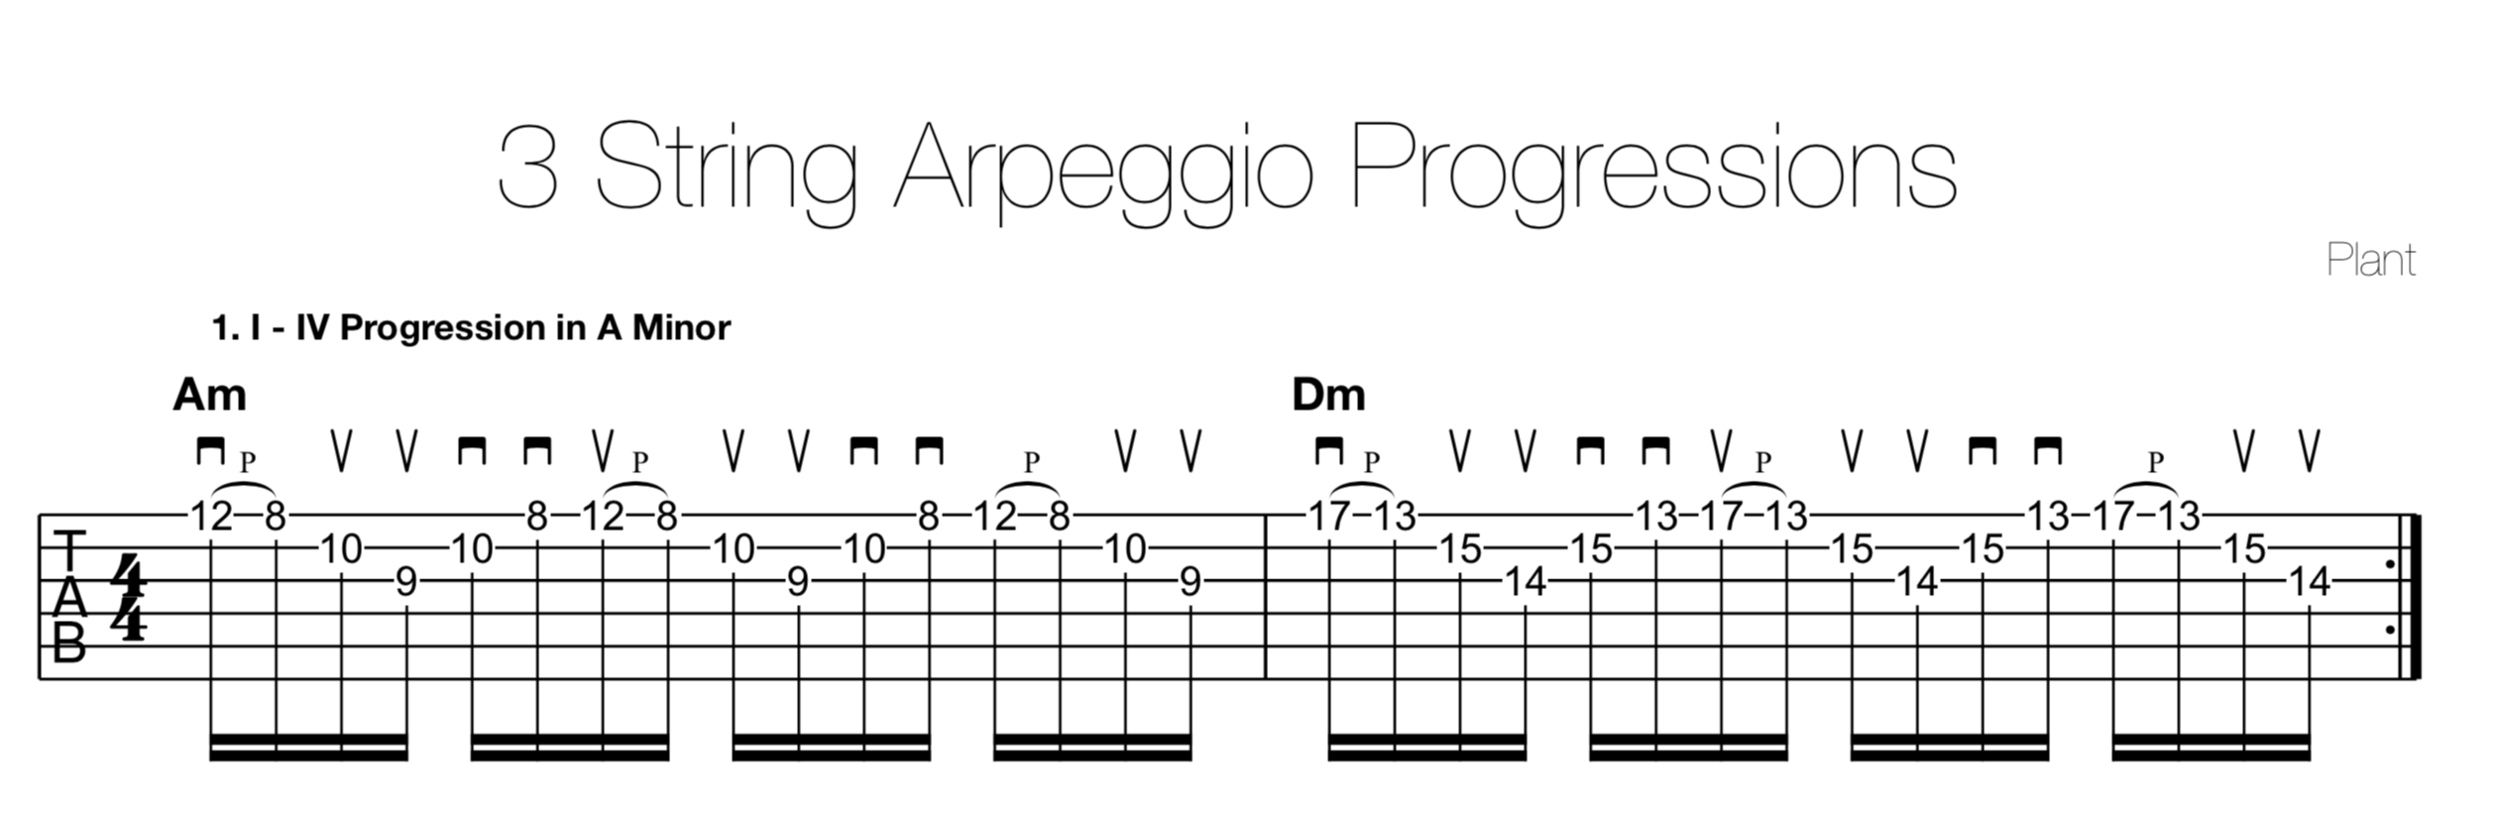
My favourite to get students started is the root 2 minor shape, which has the root note on the second string.
Here's an exercise that moves between Am and Dm using the exact same shape.
That's all well and good, I hear you say, but how do you actually play it?
For your picking hand, the full, 6 note pattern would go like this:
- Pick DOWN or UP on the top string (it depends a little on where your pick was before you started the pattern)
- Do nothing (pulloff on the top string)
- Pick UP on the second string
- Pick UP on the third string
- Pick DOWN on the second string
- Pick DOWN on the top string
- Repeat
Be absolutely certain you have got this picking pattern correct before you move on. I don't care how slow you have to do it, get it memorised, as you do not want to have to relearn this step later.
For your fretting hand, you only want to fret one note at a time. Don't hold down a full chord shape as it will ring together and sound messy. Focus on smooth, controlled movements, not speed.
Once you can get the pattern, try moving between the two shapes (Am and Dm), focussing on having no gaps while playing, even if that means playing it very slowly.
Have I mentioned play it slowly?
If that all seems pretty easy, you can now get out the metronome and gradually build up the speed. It's a fantastic warmup exercise and won't take very long to practice.
Step 2: Learn the other 5 triad shapes
All up, when we're talking about major and minor triad shapes on the top three strings, there are only 6 in total you need to learn:

If you find the pull-off note a little hard to reach (the one with your fourth finger), don't worry - you can choose heaps of notes outside of the arpeggio to play which are easier to reach when you're soloing, it's just for theory and practice purposes we need to stick to the exact triad.
You can put together similar progressions like we did in Step 1, incorporating some of these new shapes.
There's a bit of memorisation involved, so I'd recommend sticking with a couple of shapes at a time.
Step 3: Match Chord Progressions with your Sweeps
Up until now, the stuff we have been doing hasn't been hard. Maybe hard to do really fast, or hard to remember all the shapes, but technique-wise, we're just doing 6 note patterns.
Where sweep picking becomes really useful is when you can use the arpeggio shapes to outline the chords you're soloing over.
Let's say a chord progression goes Am - Dm - Em - C. I could play an Am arpeggio shape (maybe the root 2 one we did in Step 1), a Dm arpeggio shape, then an Em then a C. Now, my solo is hitting all the consonant chord tones, every time.
Of course, that might sound too safe and happy for you. So we could try some other tricks, like using a C major triad over the Am, which would make our solo sound like an Am7 arpeggio.
The sky is the limit here, so rather than bog you down with the theoretical explanations, I'd encourage you to:
- First, stick to soloing by matching the triads to the chords (eg. Am arpeggio over Am chord)
- Next, once you are confident you can do step 1, try using different arpeggio shapes over chords, using your ears to judge which ones sound good.
- Finally, get into the theory to understand which notes you're playing, as that's when you'll get a really great understanding of the fretboard and find some new sounds to try out.
Now, if you really want to see the value on sweep picking - try playing through any of the above patterns with alternate picking. You'll pretty quickly see how much easier it is to sweep!
We've covered the basics of both techniques now, so the next step is for you to master both. That way, when it comes time to play fast, you'll intuitively know which technique is best for the situation - and anyone listening to you will wonder how the hell you're so quick!